Posts tagged “raspberrypi”
-
Update
The cloud sensor is behaving badly of late, refusing to post updates. I suspect it's overheating, but it's hard to get data when the thing is across town. I had set up an SSH tunnel back to home so I could connect to it, but did the classic fail when I tried to convert it from running in tmux to running under supervisord and it didn't work and now I can't get back in. Waiting to get back to my inlaws' so I can debug it more properly.
But while it was working, I got it logging to InfluxDB (running on my home server over) over said SSH tunnel. Pretty sweet! And it was not hard to import all the previous stats I had as well.
And so but InfluxDb was running in a Docker container on the home machine, along with Grafana. Which of course led to running Telegraf on a lot of things, and collectd where I couldn't (hello OpenWRT). Which now OMG the stats. And the annotations.
But holy crap, Docker and IPv6 is a giant whirlwind of not-done-yet.
Because the kids' old laptop was, frankly, shitty, we got them a new cheap laptop and I did some complicated surgery resulting in two swapped hard drives and a new install of Debian 8 on Zombie, my home server, which is now managed nearly entirely by Chef. This was a lot of trouble -- setting up everything under a medium-weight config mgt system like Chef, I mean -- but I think it was worth it.
I've got the first breadboarded version of an Arduino weather station going, currently logging stats to InfluxDB. It is (/me checks Grafana) (/me checks on Arduino serial port for transmitter because receiver serial port acting badly) 67% humidity, 19.1 deg C and 1011.5 hPa and falling.
-
Cloud Sensor -- Field Deployment 1.0
Today was another visit to my in-laws for lunch, and we got the cloud sensor fully deployed for the first time! Check it out:
The enclosure is a plastic container, one of a set of 6 I got from London Drugs for $15. It's got clamps to keep the lid on tight, and a rubber gasket to keep water out. I cracked the lid of the first one I worked when I drilled a hole without proper support, but my father-in-law has a drill press (one of the many advantages of marrying well) and we were able to get a second container set up.
We drilled a hole in the top for the sensor can to poke through and sealed it with silicone. I thought that would hold it in place (ie, that it would act as a glue as well) but no dice. Instead, we placed the first container -- which is smaller and was designed to nest inside -- in there as well. It sat under the sensor and kept it in place. It took a little bit of arranging to route all the USB cables, but we got it sorted out in the end.
My father-in-law crafted a shelf for the container out of some cedar planking and some steel bits he had lying around. We screwed that to the patio, then the container to the shelf. Plug in the Raspberry Pi to a nearby outlet, and boom -- we had data!
...until yesterday at noon, that is; that's when the last update was posted. (I'm starting to regret not having set up an SSH tunnel back home.) I'm not sure at this point what happened, but overheating seems a reasonable guess. We made some holes on the bottom of the container for ventilation, but it's a concern. I think the Pi itself should be good for longer periods -- I had it running outside my house here for days in a row, just not inside the container. I'll have to power cycle it and see what happens.
On the data front, I realized a while back that the CSC is only updated twice a day...which means downloading every hour is overkill. The script still runs every few hours, but now it checks whether the newly-downloaded chart's checksum is the same as the previously-downloaded example; if it is, it throws it away. And I've got the analysis script set up to convert the colours of individual squares in the CSC into cloud coverage predictions. Next step is to figure out how to store this info so I can work on it. All in all, not a bad bit of progress.
-
Cloud Sensor -- Alpha One Field Deployment
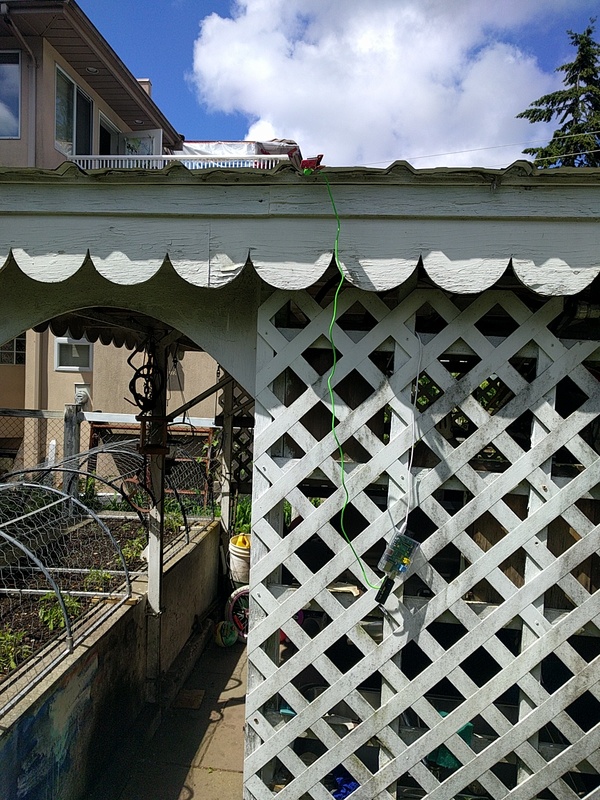
Today we visited my in-laws for our usual Sunday lunch, and I took along the cloud sensor to demonstrate for my father-in-law. He's a retired millwright with a strong sense of curiosity, so he enjoyed seeing it a lot. We set it up by a gazebo (?) he has in his back yard, with the Pi hanging from the wall and the sensor clipped to the roof:

After some clouds rolled out, it got seriously sunny. The data reflected that:

For the record, the ambient temperature is not really to be trusted. It kept reading in the mid-thirties, but a nearby thermometer showed nothing higher than 25 all day. And when the sensor is deployed here, it seems to register about a 10 degree higher temp for the sky; doubtless it's the combination of the wide FOV (90 degrees) and the narrow slice of the sky it can see from my front porch.
The day before I'd bought a plastic container to use as an enclosure, so we kicked around ideas about how to make it work. I'd picked it because the clipping lid seemed like it would keep out the weather quite well, especially since the lid completely overhangs the container -- but I'd forgotten to think about shedding water. The lid is recessed maybe half a centimetre, and any rain would just pool in there -- not what I want. We agreed that the enclosure definitely needs at least a flat roof, and ideally something rounded that would let rain roll off. A plastic bowl with a flat bottom would do the trick nicely.
So what worked well?
- Wireless worked without a hitch -- very happy with this, as I wasn't sure it would reach from inside to the back yard
- Data logging worked too, including status updates when rebooting
- Good to kick around ideas
- Got script working to analyze the CSC and turn it into hour-by-hour predictions; some initial ideas about how to store that data, and how to visualize that and logged temperature data
Needs work:
- Enclosure
- Committed API key to git without noticing; had to generate a new one
Next up:
- Desolder header pins so eval board can be mounted with the sensor poking through the lid of whatever
- New enclosure
- Think about how to store CSC predictions
If you're interested:
- Thingspeak channel (infrequently updated)
- Code for this project at Gitlab
-
Cloud Sensor -- We have data!
The MLX90614 eval board arrived at last. I managed to get the header pins soldered on without melting much, and hooked up to the Raspberry Pi. The default firmware logs the temperature in Fahrenheit to the serial port every tenth of a second, and I was able to read it out with screen without a problem.
Next up was adjusting the firmware slightly to slow it down a bit, write out ambient temperature as well, and to switch to Celsius. (Cue feeling bad about not using Kelvin.) That took all of ten minutes, so huzzah for that.
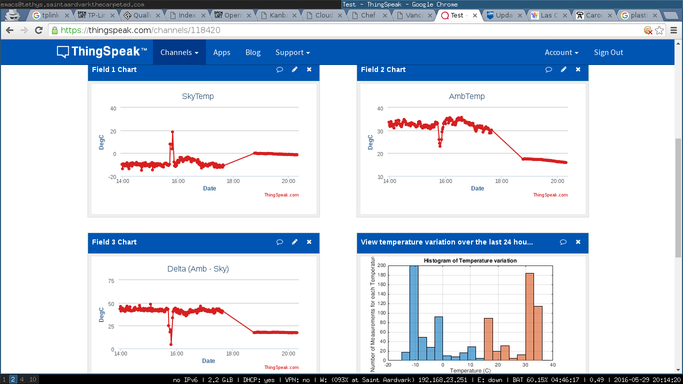
Finally, I set up an account at ThingSpeak.com (free as in beer, plus free as in freedom software, plus export of data whenever you like), and set up a stupid simple script to send data both to a CSV file and to, you know, the cloud. The result? SWEET, SWEET FREEDOM:

Clockwise from top left, that's: sky temperature (sensor pointing up), ambient temperature, and the delta (ambient - sky). It's interesting to see how smooth the ambient temp is compared to the sensor temp.
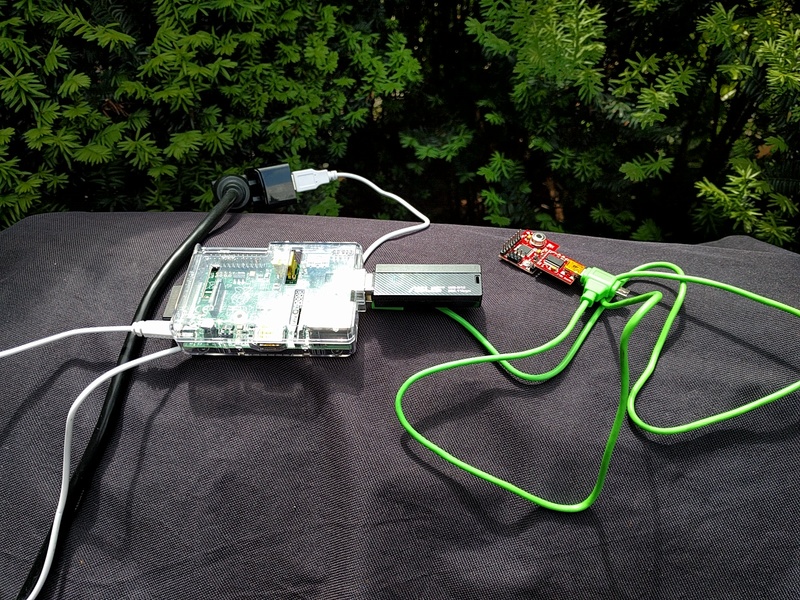
Oh, and here's a shot of how it looks sitting on top of the BBQ outside:

Not at all weatherproof, of course, so that comes next. With the way I soldered the header pins on (all pointing up), that's going to be a challenge; I may de-solder them and have the top as bare as possible. That would let me (say) drill a hole in a Tupperware container, push the sensor through, then epoxy around it for waterproofing. As for the Pi...not too sure. I may try to mount it out of the weather, then run the sensor out under the sky.
-
Cloud Sensor -- First iteration
Since my last post, I've made a bit of progress:
I've ordered the Sunfounder Arduino starter kit, along with a Arduino Uno clone and a Mega clone (all arrived)
I've ordered the MLX90614 eval board plus a Redboard from Sparkfun (can't have too many Arduinos!) (arriving shortly)
I've done some initial playing around with the Arduinos and the accelerometer included in the Sunfounder kit, as a standin for the MLX90614. It amazes me how easy it is to get started with all of this...
I've grabbed one of the Raspberry Pis around the house and got it logging data over the USB serial port from the Arduino
Even got WiFi working on the Pi; it's an older one that doesn't have it built-in, but I've got an extra Asus N13 lying around that seems to work well
I've modified ttylog to include the date in its output; may not seem like much, but I'm no C programmer
Rough plan right now is:
Have the Arduino log once a second to the serial port; that's far too much data, but at least it'll be easy to see if it's working
Log that with ttylog; it'll be running under supervisor, and will log for an hour before exiting (and starting up again)
Once an hour, assuming WiFi works in its final location, try to rsync the log files home; if not working, pick up the log files manually
Put it all in a waterproof case of some sort, and find a place to plug it in at my in-laws (they've got a nice big yard)
-
Cloud sensor -- initial plans
So after doing some digging around, I think there's a simpler approach than using Peltier coolers, and that's using an IR temperature sensor. This guy has built his own using this approach, though he's using Arduino controllers to read them. That led me down the Arduino path, and after a lot of reading I think I've got an approach that might work.
Sparkfun sells the MLX90614 temperature sensor in a couple of different formats: bare sensor, or on an eval board. After reading that tutorial, my understanding is:
I can connect the evaluation board to an FTDI cable/breakout board, and hook that up via USB to the Pi. The default sketch in the evaluation board will give me temperatures in Fahrenheit once per second over a serial port. Later, I can change the sketch by using the Arduino IDE. Pro: Quick to start, USB is dirt simple, and I don't need a RedBoard or similar. Cons: Not as flexible as it would be if connected to RedBoard, since that would give it lots of expansion possibilities (humidity sensor, motion-activated potato cannon, etc.)
I can connect the evaluation board to the Pi via I2C. Can still reprogram the sketch later. Pro: Not really sure. Cons: Have to build my own I2C connector....not that hard, from what I can see, but I'm a newbie.
I can get the bare sensor (no eval board) and hook it up to the Pi via I2C. Pro: Unsure. Cons: Much more fiddly than anything I've tried before.
I can jump right in to Arduino and get an Inventor's Kit. I can use the bare sensor (as shown in the tutorial -- start on breadboard, package it up somehow when I'm confident it's working), or the eval board (doing something like [this example4), using I2C in both cases. Pro: Lots of room for expansion, Arduinos are fun, etc. Cons: Will take me a while to get up to speed.
Assuming I've got all that right...my inclination is to start with the FTDI breakout board and USB; that'll make the learning curve easier, and I can get the Inventor's kit later on.
I've asked on the SparkFun forum whether I've got all this right...time will tell. But getting quickly started with the USB seems like a good way to start.
-
Possible Raspberry Pi project
For a while now I've been wondering idly how I could measure cloudiness. My goal is to both track how cloudy it is now (and over time), and to compare actual cloudiness with predictions from ClearSkyChart.
A few days ago I came across an approach that I think might work. This person measured the current coming from a Peltier cooler when exposed to the night sky. The difference in temperature between the ground-facing side (warm) and the sky-facing side (cold) varied depending on whether it was cloudy (less difference in temp == less current) or not (greater difference in temp == more current). It occurred to me that I could use a Raspberry Pi I've got lying around to take that same approach.
Since then I've been browsing around, and here's what I've found:
- A big-ass Peltier cooler on Amazon
- A thread on the Raspberry Pi forums on digital multimeters with USB output (who knew?)
- A crapton of USB multimeters (so, wait, you mean I don't have to solder my own voltage meter?)
- The Sigrok project, which is a generic signal analysis project for Linux et al.
- Another page on Linux software for reading from serial adapter-equipped multimeters
- The PyDMM project, which looks old but hey, Python!
I'm starting to think I've got a good approach here.